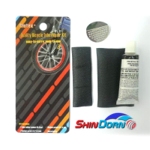
High quality tire repair glue and tire patches for tire puncture repair.
Back To Product Information List
Details:
Packaging DetailsCard size 6.6×15.2 cm |
|
|
Main Features: High quality tire repair glue and tire patches for tyre puncture repair. Products comply with US and EU standards. MOQ (minimum order quantity) as low as 5,000 sets. <style=”color: #000000;”=””>Complies with EU REACH standards, containing no DBP, BBP, DEHP, DINP, DNOP and DIDP in inner tube repair glue.</style=”color:> Our Products have been sold to: USA and Germany! Shin Dorn Manufacturing: Bike repair kits are essential for outdoor puncture repair. Shin Dorn offers professional repair tools, including tire repair glue, vulcanizing rubber patch, tire levers, chain tool and multi tools. Products are made of materials in accordance with US and EU regulations. Self adhesive tire patches are also available for fast and easy tire patching. Custom packaging services are available to suit your target market. |
|
| Quick Details | |
| Product Type: | Bicycle repair kit |
| Model Number: | 1002486-B |
| Specification: | Tire repair glue (12 ml) x 1 pc Vulcanizing rubber patch large (2″x3″ / 50mmx75mm) x 1 pc Vulcanizing rubber patch small (1″x1″ / 25x25mm) x 3 pc Metal tire rasp (1.15” / 30mm diameter) x 1 pc |
| Usage: | Bike tire puncture repair |
| Target Markets: | Repair kit for sale in bicycle shop, mega supermarket, etc. Accessory item for new bicycle. |
| Shelf Life: | 12 Months |
| Regulations: | Tire repair glue complies with EU REACH standards, containing no DBP, no BBP, no DEHP, no DINP, no DNOP, no DIDP |
| Company Certificates: | ISO9001:2015 Quality Management System |
| Customizations: | Custom specifications of bicycle repair glue, tire patches and repairing tools. Color print with client’s logo and design on package. Custom packaging of blister pack, double blister pack and plastic container. Bulk pack is also available |
| Physical Properties | |
| Patch Raw Material: | Viscous liquid with semi-transparent yellow color |
| Glue Main Ingredients: | n-hexane, synthetic rubber, hydrocarbon resin. |
| Odor: | Petroleum |
| Properties: | High strength tire repair glue Fast curing and waterproof |
| Viscosity (25ºC): | 4750 mPa.s. |
| Water Solubility: | Insoluble |
| Boiling Point/Range: | 156.2~167°F (69~75ºC) |
| Flash Point: | -7.06°F (-21.7ºC) |
| Evaporation Pressure: | 155 mmHg at 68°F (20ºC) |
| Vapor Density (Air=1): | 0.675 grams/cubic centimeter |
| Reactivity: | Slight |
| Corrosivity: | Not corrosive |
| Flammability: | Serious |
| Stability: | Stable at normal temperature and pressure under ordinary conditions of use and storage |
| Biodegradibililty: | Moderate |
| Storage: | This product is flammable and should be stored in its original packing and in a cool and dry indoor area, with temperature no higher than 104°F (40 ºC). Storage temperature should be between 41°F (5 ºC) and 104°F (40 ºC). Keep containers closed to avoid contamination. Do not expose material or container to source of ignition, caustics, oxidizers, heat, spark or flame. Keep away from food and drinks. Keep out of the reach of children |
| Application Guidelines | |
| Operating Temperature: | 50~104°F (10~40ºC) |
| Method of Application: | Glue brush or scraper |
| Instruction: | 1. Remove the object that has caused the puncture. 2. Take out the inner tube with tire lever. 3. Locate the puncture. Put the tube in water to look for bubbles if necessary. 4. Clean the area around the puncture and keep it dry. Roughen the area with tire rasp or abrasive paper. The area roughened should be larger than the rubber patch you are to apply. 5. Apply a thin layer of tire repair glue on the puncture with a clean and dry tool, and spread it around the area. The area should be larger than the rubber patch. Wait for at least 5 minutes for the cement to dry. 6. Take the rubber patch. Cut out a rounded or oval-shaped piece of the patch, which should be at least three times larger than the puncture area. 7. Peel off the backing and stick the rubber patch onto the puncture area. Press firmly and rub the patch onto the inner tube, starting from center and then all over the area. Make sure the patch is firmly attached before refitting the tube. |
This Post Has 2 Comments
Comments are closed.


Pingback: Super Sticky Tire Patch Fixes Puncture in Minutes - Product Branding | Shin Dorn USA
Pingback: How to repair a puncture in bicycle tube using rubber cement?